Back in October 2018; I purchased a new 2018 F-150 Raptor from new dealer stock to replace my 2000 Dodge Dakota which I purchased new from a dealer in Oregon. Given the way Chrysler failed to support their products under warranty; I informed them that I would never own another Chrysler product again. If you want more details as to why I won’t support that company any more; I posted briefly about it here.
I bought the Raptor to replace my daily driver and to haul the occasional Pinball machine to/from events. One of it’s jobs is to haul my enclosed trailer when I’m taking more than one machine. The result is I needed a new drop hitch. I originally started with a 8inch drop; but that was really too low for other trailers – while it fit my trailer fine. I ran into this when a friend rented a Uhaul trailer and it was nearly dragging the ground. As a result I decided I needed an adjustable trailer hitch which then became obvious that I needed a way to store this trailer hitch when it isn’t in use. On my other truck; I basically left the hitch always on the truck and managed to hit it with my shins or sometimes the driveway on the way out of the house. I wanted to avoid that this time around. Originally; I thought I might fit the hitch in the center console; but it turned out to be too heavy and bulky. So I’ll also be talking about my storage solutions in this post.
Final Amazon Shopping List:
- Uriah Products UT623410 Adjustable Aluminum Mount with 3 Interchangeable Balls-6″ Drop
- motormic Trailer Hitch Lock Pin Set – 2pcs. 5/8″ Extra Long Black Pins
- Pelican Vault V200 Medium Case
- Polyethylene Foam:
- Plano Pocket Stowaway 4 Compartment Utility Box
- Gap Filling CyanoAcrylate (CA) Glue
- CyanoAcrylate Accelerator
- Needle tip Glue Bottle
- Premium Cinch Straps – Velcro
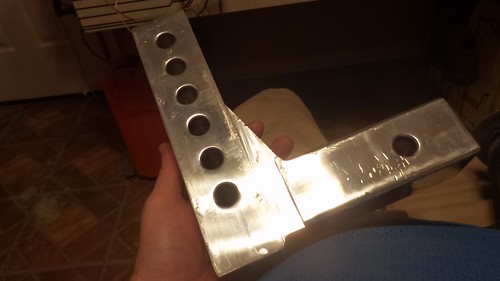
My saga began when I came across a Uriah Products UT623410 Adjustable Aluminum Mount with 3 Interchangeable Balls-6″ Drop on a Amazon Warehouse deal for a good price. In the past I had really good experience with AMW deals; where the packaging or minor issues which didn’t effect functionality were worth the discounted amount. The biggest problem with this mount was it was what I’d call heavily used. It appears the previous purchaser used it for a cross country trip; then boxed it back up and shipped it back to Amazon. Because of this I decided I wanted to clean it up and make it match the “Electric Blue” of my Raptor. I started with the drop mechanism. The two main pieces are made from a thick Aluminum alloy; so they tend to scratch and dent under heavy use. Specifically; the drop mech tends to “crease” on the lower part of the receiver when it’s rocking back and forth while hauling the trailer. I cleaned up the previous user’s creases with a file and some sandpaper:
I proceeded to clean the part and then powder coat it with the blue powdercoat I had from a previous project.
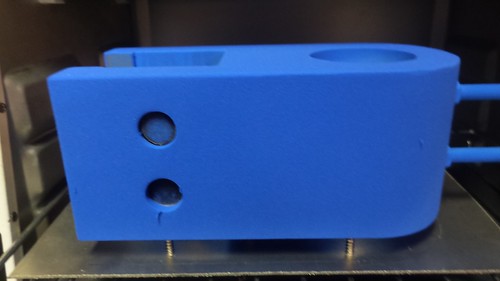
I did the same thing with the slidable ball mount; here’s the part getting the powdercoat:
I used some carriage bolts sourced from Lowes to secure this heavy part on my makeshift powder coating rack.
Next, I used a scrap sheet of aluminum to make a makeshift “cooking” stand for use in the toasting oven. Here’s the part before heating:
Here’s the part after curing the powder coat:
I did some more offline work to add a powder coated “raptor” to the ball mount on both sides. Sadly I didn’t take any pictures of this process. The process was that I basically put some Polyamide tape over the mount and then laser etched the raptor image into the powdercoat and tape. Once I had clean metal from the laser etch; I powdercoat a matte black onto the polyamide tape and re-baked the piece. Here’s the installed ball mount with the Raptor embellishment:
With the ball mount complete; I turned my focus on how to store the hitch when it’s not in use. This turned out to be tricky because I had already used up all the under rear seat storage with other items; so I needed a organized way to keep it out of the way while being able to quickly install it when needed. After some research; I decided I needed to use a Pelican Vault V200 Medium Case to store the hitch and all it’s accessories in “layers” inside the Pelican. I wasn’t keen on hand carving foam… and the foam that came with the Pelican wasn’t strong enough to resist the weight of the hitch. A plan solidified which involved laser cutting some high density PE foam on my cutter. Why PE? Because it’s laser safe ad can be bought readily on Amazon. Before I got to that point; I proceeded to work out the geometry in CAD before committing to lasering the foam and to make sure everything would fit.
I started by using a set of digital calipers to measure the various parts I wanted to put in the case and transferring the basic outline into a DXF file. Most of the parts are under 2inches tall. with the notable exception of the ball mount. This is why I decided on the 2inch thick foam and then stack two layers of the foam to hold the various other miscellaneous pieces. For the Ball mount; I’d have to mount it vertically to keep the horizontal space for the “L” shape of the drop. A couple of design itterations later; here’s the final bottom layer as seen in CAD:
The bottom bascially holds the three balls, the ball mount, the drop, one of the locks, and one of the ball pegs. The Top Layer housed the remaining parts:
This layer houses the remaining parts:
- remaining Z-height of the Ball mount,
- The remaining Z-height of the 2-3/4 ball,
- The remaining ball peg,
- a second hitch lock,
- The unused receiver hitch peg,
- a tonge lock,
- a spot for the Plano Case – which holds the misc clips,
- and a spot for the Keysmart keyring (for the various keys)
I wanted the bottom of the locks and pegs to be flush with the top of the given layer so I made some “filler” parts out of 1inch. I wanted the ball mount to be “snug” between the first and second layers; so I also made a filler out of 1/2inch foam to mount on top of the second layer.
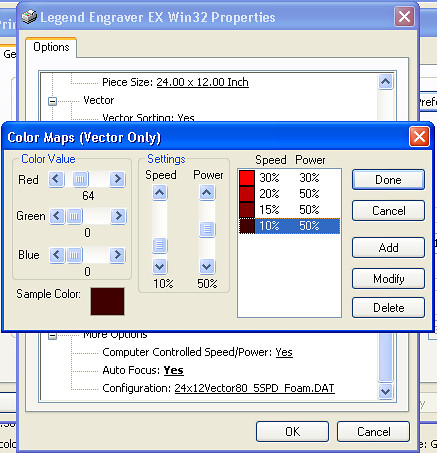
With the CAD work done; I started trying to laser cut this PE foam. Turned out to be quite tricky for several reasons. First; there’s no published power/speed values for the foam. Second; my poor Epilog 24TT laser just lacks the power to punch thru the foam. My laser specs for a new tube is 25watts – but I’m sure mine has aged and probably puts out 20ish watts if that. Third; the 2inch foam is really too thick for the 2in lense my machine has. Focusing on top of the 2in foam; the laser’s focal distance causes almost unmanageable beam spread at about 1/2inch from the bottom of the 2in foam. This causes extreme melting at the “bottom” of the layer. Again because the focal length of a 2in lens; it was impossible to re-focus the laser to cut the final inch in z-depth on the foam. Regardless; I was able to cut the pieces – which really turned out better than if I’d tried to hand cut them. I don’t remember specifically what I used for power; but it was multiple (read 4-6) passes with varying power. I started with 30% power at 30% speed for the initial cut. This was dialed in by doing some test cuts to maximize cutting and minimizing shrinkage due to excessive heat at the cut line. With each pass; I reduced the speed by 10, 5, and 5 while adding 20% more power. Again; this was to “punch” thru the remaining material without being able to refocus the 2in focal length. Here’s the final “table” of the power settings used for each pass:

The 1 inch and 0.5 inch foam cut much easier; I think the 1inch foam cut in 2 passes and the 0.5inch with one pass at 30/30. With the foam cut; it had to put the parts together. The only way to really get this foam to glue to itself is using CyanoAcrylate glue. I forget where I read this; but Google search basically indicated this is how the “industry” makes custom shipping foam out of this stuff. I did this by putting the CyanoAcrylate Accelerator in the Needle tip Glue Bottle. Then I put the Accelerator on one side of a seem and the CA glue on the other. Then using my fingers; pressing the seem together for about 15-20seconds. Take my advice here… unless you want to be dealing with superglued spots on your finger tips; use some disposable latex gloves. The CA glue still gets everywhere… so make sure you’re wearing “junk” clothes. Even after 20seconds; the glue really hasn’t set well. So once you completely finish a “layer”; leave it to set overnight so the CA glue will completely “cure”. The Accelerator is suppose to make this bonding instant… but either I was using too much of it… or the glue had a longer shelf life. So since I was going to be using this foam for really heavy things; I just left it to cure overnight.
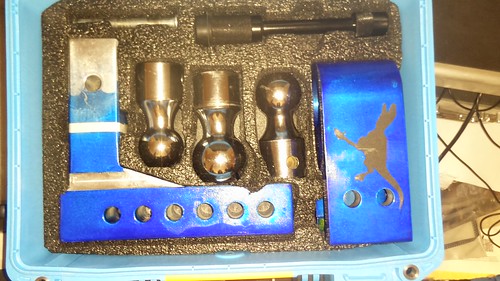
What did all of this work yield? Here’s the bottom layer populated with it’s various pieces:
Here’s the top layer with it’s pieces. This was a earlier non-reworked version which didn’t have the tounge lock or keysmart keyring areas in the empty spaces.
The Plano Pocket Box holds the various clips, o-rings, and extra keys for the locks:
IIRC, I reused the compressible foam sent with the vault case for the top of the lid so that the layers would remain snughly compressed in the Vault case:
I used the Premium Cinch Strap to secure the case in the bed of my truck by securing it to the Camper shell’s linear actuator:
With that project is complete. I’ve used the case about 3-4 times and it makes the whole storing of the drop hitch easy.